Quick-Start Guide
An easy onboarding guide for Sentry.
By the end of this guide, you'll be able to create and configure projects in Sentry to gain detailed insights into issues, including the exact lines of code affected, the environment in which they occurred, and the releases they originated from. Additionally, we'll walk you through Sentry's most essential integrations. If you get stuck anywhere, please Ask Sentry AI or join our Discord community.
Check out this step-by-step walkthrough on creating and configuring a Sentry project within your environment.
- Sentry's in-app project creation workflow allows you to enable Tracing and Session Replay. At a minimum, this will allow you to take advantage of the free allocated Tracing and Session replay quota.
The Sentry project creation flow includes a "Source Map Wizard" to help streamline the uploading of your artifacts (source maps, debug information files, symbols).
- Source Maps (JS) and Debug Symbols are crucial for translating minified or obfuscated code back into a human-readable format, allowing you to pinpoint the exact lines of code causing your issues. Here you can find instructions for JavaScript as well as Android and iOS.
Add Environments and Releases to Your Sentry init.
- Set up environments (production, staging, etc.) and releases in Sentry to streamline error tracking. Environments filter issues by context, while releasing link errors to code versions for easier debugging.
To manage user authentication and provisioning, you can configure Single Sign-On (SSO) and System for Cross-Domain Identity Management (SCIM).
Source Code Management: Integrating your SCM with Sentry is critical for efficient issue resolution. It links code changes to errors, helping you identify and resolve issues quickly. WIth commit tracking and Suspect Commits, users can pinpoint problematic changes and trace them to the relevant stack trace.
SCM (GitHub) integration highlights include:
Messaging/Notifications: A messaging integration will allow you to configure alerts based on issue severity, resolving or ignoring issues directly from Slack, and links back to Sentry for deeper investigation. This keeps teams proactive by instantly alerting them about critical issues.
Issue Tracking: Helps teams track and manage Sentry issues within their ticketing system. You will be able to trigger the automatic creations of issues from Sentry events, sync status updates between tools, and link Sentry issues to existing tickets for streamlined resolution.
- Linking Sentry to JIRA keeps issue statuses synced, automatically marking Sentry issues as resolved when appropriate. This ensures that reappearing issues get flagged regressions.
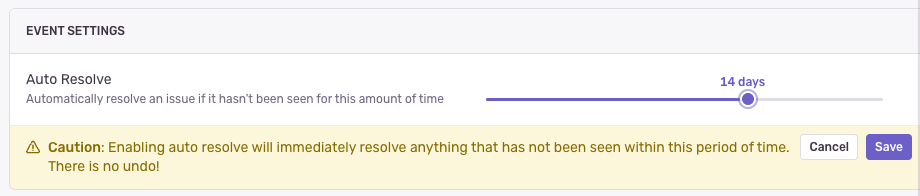
- To manage stale issues within Sentry, enable auto-resolve for those unseen within a set timeframe. We recommend setting auto-resolve to 2 weeks for optimal issue and regression tracking. Configure this in Project Settings > General Settings > Auto Resolve.
By following this guide, you should have Sentry projects created, your integrations set up, and be configured for SSO/SCIM. For further customization, explore the official Sentry Documentation or ask Sentry AI.
Our documentation is open source and available on GitHub. Your contributions are welcome, whether fixing a typo (drat!) or suggesting an update ("yeah, this would be better").